 Save
Save I discovered hash brown waffles by accident on a lazy Sunday morning when my roommate challenged me to make something savory with the waffle iron instead of the usual sweet stuff. I grabbed what was in the freezer—a bag of hash browns—and started rummaging through the fridge like I was on some kind of cooking show. The first batch came out golden and crispy, and when I cracked into it, melted cheddar oozed out like a beautiful surprise. That moment convinced me these weren't just leftovers masquerading as breakfast; they were a legitimate game-changer.
The first time I made these for guests, I was nervous about the whole thing flopping or sticking, so I tested one waffle before they arrived. When that first one slid out of the iron perfectly golden with the cheese still bubbling at the edges, I actually called my sister to tell her about it. My friends devoured them with hot sauce and sour cream, and someone asked for the recipe before even finishing their plate. That's when I knew I'd stumbled onto something worth keeping around.
Ingredients
- Frozen shredded hash browns (3 cups, thawed and patted dry): The key to everything is getting these as dry as possible; I learned this the hard way when a soggy batch refused to crisp up, so now I spread them on paper towels and blot them like I'm preparing them for surgery.
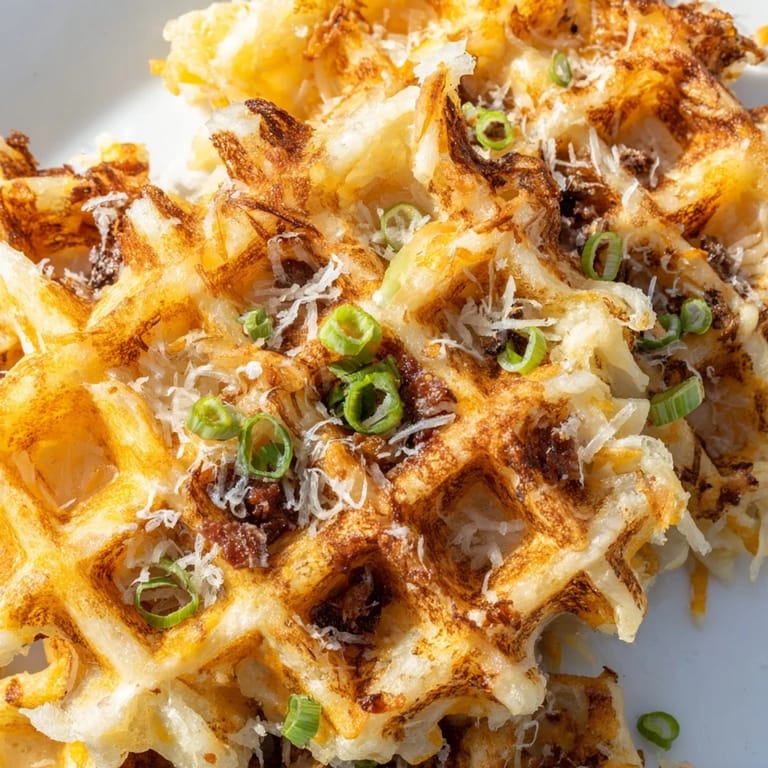
- Sharp cheddar cheese (1 cup, shredded): Sharp cheddar gives you that punchy flavor that doesn't get lost when it melts, unlike mild cheese which basically disappears into the background.
- Grated Parmesan cheese (¼ cup): This adds a salty, nutty depth that makes people ask what secret ingredient you used.
- Large eggs (2): They act as the binder that holds everything together without making the waffles dense or heavy.
- Green onions (2, finely sliced): These give you bright bursts of flavor throughout and look prettier than you'd expect from such a casual ingredient.
- All-purpose flour (¼ cup): Just enough to help everything hold its shape without making it doughy.
- Garlic powder and onion powder (½ teaspoon each): These create an umami backbone that makes each bite taste intentional and seasoned.
- Salt and black pepper (½ teaspoon and ¼ teaspoon): Don't skip the seasoning step; it's what transforms this from bland to crave-worthy.
- Sour cream, chopped chives, or hot sauce (for serving): Pick your poison; each one elevates the waffle in a different way.
Tired of Takeout? 🥡
Get 10 meals you can make faster than delivery arrives. Seriously.
One email. No spam. Unsubscribe anytime.
Instructions
- Get your waffle iron ready:
- Preheat it according to the manufacturer's instructions and lightly grease with nonstick spray or oil so nothing sticks to your creation. This seems obvious, but I've watched people skip this step and regret it immediately.
- Mix everything together:
- In a large bowl, combine the hash browns, both cheeses, eggs, green onions, flour, and all the seasonings. Stir until it's well combined and slightly sticky—it should hold together but not be wet.
- Scoop onto the iron:
- Use about 1 cup of mixture per waffle and gently spread it out to cover most of the cooking surface. This is where you learn to be gentle; pressing too hard will just compress all that crispy potential.
- Cook until golden:
- Close the waffle iron and let it work for 5 to 7 minutes until the waffles turn golden brown and crispy on the outside. Your waffle iron might cook faster or slower than mine, so start checking around the 5-minute mark if you're not sure.
- Remove and repeat:
- Carefully slide the finished waffle onto a plate using a spatula and repeat with the remaining mixture. If they start sticking, the iron probably needs a touch more grease.
- Serve right away:
- These are best eaten immediately while they're still warm and crispy, topped with whatever you're in the mood for.
 Save
Save There was this one morning when I made these for my neighbor who'd just moved in, and it became this unexpected bonding moment over breakfast at my kitchen counter. She was stressed about the move, and somehow hot hash brown waffles with crispy edges turned into this whole conversation about comfort food and home. That's when I realized these weren't just delicious; they were the kind of thing that makes people pause and actually enjoy a moment together.
The Crispy Factor
The difference between a crispy and a soggy waffle comes down to two things: dry hash browns and not disturbing them too much while they cook. I used to poke at them constantly, worried they weren't cooking, but that just releases steam and ruins the crispiness. Now I set a timer, trust the process, and let the heat do its job. The waffle iron is really good at what it does if you just let it.
Flavor Variations Worth Trying
Once you nail the basic recipe, the fun starts. I've swapped the sharp cheddar for pepper jack and loved how the heat built throughout the meal, or went with mozzarella when I wanted something milder. My friend added crumbled bacon and suddenly it became this completely different breakfast experience. The beauty of this recipe is that it's flexible enough to adapt to what you have or what you're craving that morning.
Make Ahead and Storage
These waffles freeze beautifully, which means you can make a double batch on the weekend and have instant breakfast ready all week. Just let them cool completely, stack them between parchment paper, and store them in a freezer bag. When you're ready to eat, pop them straight into the toaster for a few minutes and they come back to life almost as good as fresh.
- Cool the waffles completely before freezing so condensation doesn't make them soggy.
- They'll keep frozen for up to a month, so don't hesitate to make extra.
- Reheating in a toaster works way better than the microwave if you want to keep the crispy texture.
 Save
Save These waffles turned out to be one of those happy accidents that somehow became a regular in my breakfast rotation. There's something really satisfying about pulling something this good out of a waffle iron and knowing you can make it whenever you want.