 Save
Save Last summer, I was standing in my kitchen on one of those afternoons where the heat made you move in slow motion, and I needed something cold that didn't feel like just another popsicle. A ripe peach was sitting on my counter, almost too soft to slice, and I had this sudden thought: what if I froze yogurt? I'd eaten frozen yogurt bars before, but they always felt too sweet or artificial. This time, I wanted something I could make myself, something with actual fruit and taste. These bites changed how I thought about summer snacking.
I made these for my neighbor's daughter one afternoon, and she came back three days later asking if I could freeze more because she'd eaten them all. That's when I knew they weren't just a personal whim, but something worth perfecting. There's something special about a snack so simple that even a kid can help make it, yet still feels like a treat.
Ingredients
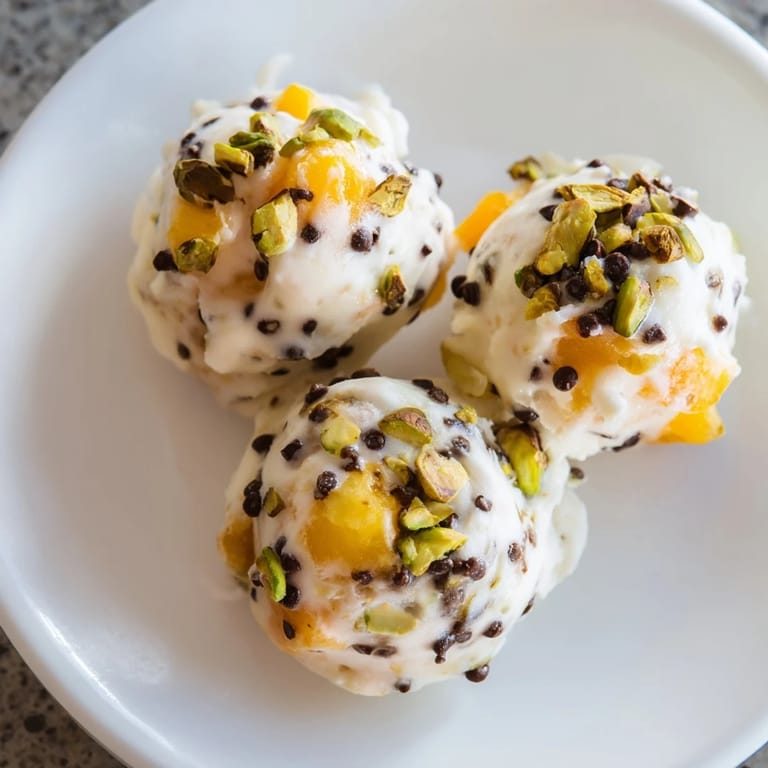
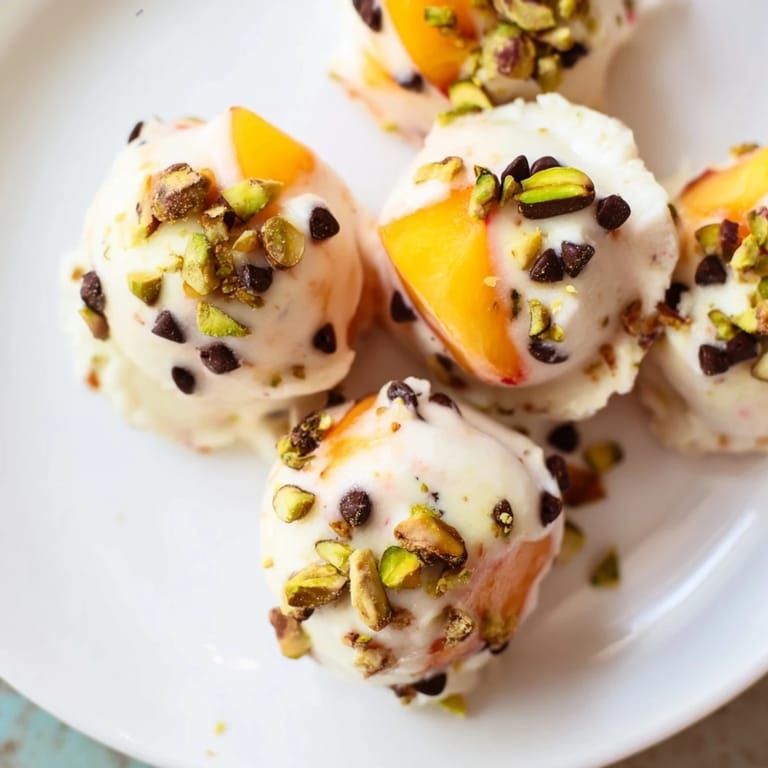
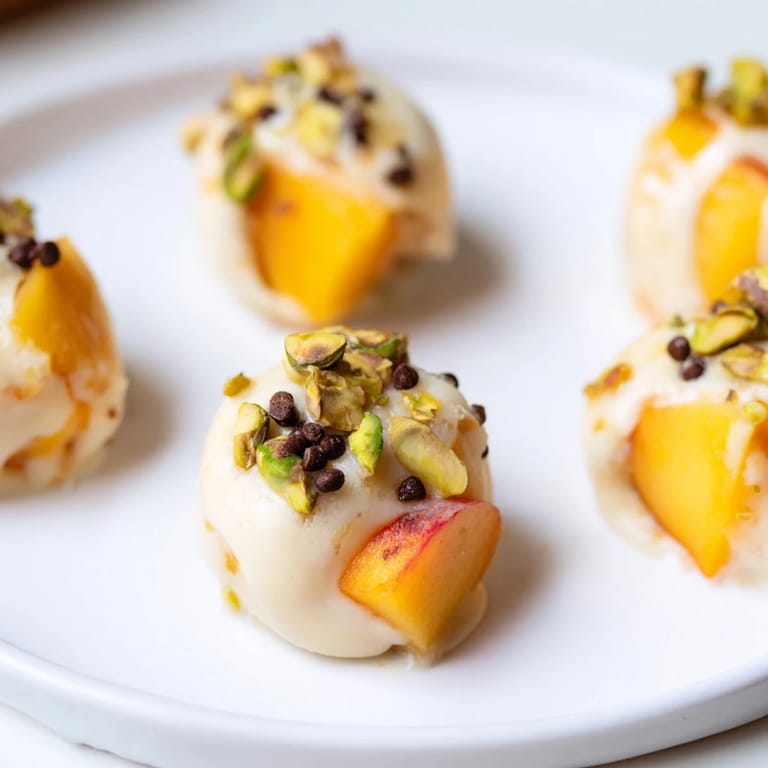
- 1 large ripe peach, peeled, pitted, and finely diced (about 1 cup): The peach is everything here—it needs to be soft enough that you can press your thumb into it, not hard and mealy. I learned the hard way that cutting it into small pieces helps the flavor spread evenly through every bite.
- 1 cup plain Greek yogurt (full-fat or low-fat): This is your base, and the tanginess keeps the bites from tasting one-dimensional. Full-fat makes them creamier, but low-fat works if that's what you have on hand.
- 2 tablespoons honey or maple syrup: Just enough sweetness to balance the peach and yogurt without making them taste like dessert. I use honey most of the time, but maple syrup adds an unexpected depth.
- 1/2 teaspoon pure vanilla extract: This small amount ties everything together, making you taste peach and creaminess first, then vanilla as an undertone.
- 2 tablespoons finely chopped nuts (e.g., pistachios, almonds) - optional: Nuts add texture and a slight richness, though I skip them sometimes if I'm trying to keep things simple.
- 2 tablespoons mini chocolate chips - optional: These surprise you with little pockets of chocolate as you eat, turning a healthy snack into something more playful.
Tired of Takeout? 🥡
Get 10 meals you can make faster than delivery arrives. Seriously.
One email. No spam. Unsubscribe anytime.
Instructions
- Prepare your surface:
- Line a baking sheet with parchment paper or get your silicone mold ready. This step takes thirty seconds but saves you from a frozen mess stuck to metal.
- Mix the creamy base:
- In a bowl, combine the yogurt, honey, and vanilla extract, stirring until the mixture is completely smooth with no streaks. This is easier than you'd think, and you want to avoid lumps because they'll freeze and taste grainy.
- Fold in the peach:
- Add the diced peach gently, stirring just enough to spread it evenly throughout. Over-stirring will bruise the peach pieces, so use a light hand and stop as soon as you can't see white streaks of yogurt.
- Portion into bites:
- Drop heaping tablespoonfuls onto your prepared sheet or into the mold, leaving a little space between each one. The mixture should hold its shape; if it's too loose, refrigerate it for ten minutes first.
- Add toppings, if using:
- Sprinkle nuts or chocolate chips on top of each bite before freezing. The toppings stick better when the mixture is still slightly soft.
- Freeze until solid:
- Place everything in the freezer for at least two hours. You'll know they're ready when they're firm all the way through and don't stick to your fingers.
- Store and serve:
- Transfer the frozen bites to an airtight container so they don't pick up freezer flavors. Grab them straight from the freezer whenever you need something cold and satisfying.
 Save
Save The day I realized these had become a real habit was when my daughter asked me what I was making instead of assuming it was just another snack. That question made me pay attention to the small ritual of pulling one out, that satisfying moment when it's just cold enough to feel like a treat.
Choosing Your Peach
Not all peaches are created equal, and this recipe taught me to stop picking them out of habit. A ripe peach should smell fragrant near the stem, and when you hold it in your palm, it should yield slightly to pressure without feeling mushy. If you catch a peach at the very peak of ripeness, these bites become something special; too early and you're just freezing sourness, too late and they turn mushy. I've learned to buy my peaches a day or two before I plan to make these, and to keep them on the counter away from direct sunlight.
Variations That Work
Once you make these once, you'll want to experiment. I've swapped peaches for nectarines, mango, and fresh berries, and each one tells a different story on your tongue. The basic formula stays the same, but the personality changes with the fruit, which is exactly how I like to think about cooking. One summer I added a pinch of cardamom, and another time I stirred in a little granola for texture. The recipe isn't precious; it's more like a starting point where you can be curious.
Storage and Longevity
These bites stay perfect in an airtight container in the freezer for about two weeks, though they never last that long in my house. I've learned that they freeze better than I expected, staying creamy rather than turning icy, which surprised me the first time I made them. The texture degrades only if you let them get too warm or refreeze them, so just keep them cold and grab what you need.
- Store them in an airtight container to prevent freezer burn and flavor absorption from other foods.
- Label the container with the date if you're the type to forget when you made them.
- If a bite starts to thaw, eat it right then rather than refreezing, because the texture won't come back the same way.
 Save
Save These frozen peach yogurt bites became my answer to those moments when you want something cold and clean-tasting, not heavy or overly sweet. Make them once and you'll understand why they keep getting made.
Recipe FAQs
- → Can I use different fruits instead of peaches?
Yes, nectarines, mango, or berries can be substituted to create varied flavors in the frozen bites.
- → How long should the bites be frozen?
Freeze the bites for at least 2 hours or until they are fully firm to ensure the right texture.
- → Are there options for extra crunch or flavor?
Sprinkle finely chopped nuts or mini chocolate chips on top before freezing for additional texture and taste.
- → Can this snack be made dairy-free?
Using coconut-based or other plant-based yogurts allows for a dairy-free version while keeping the creamy texture.
- → What tools are needed to make these bites?
A mixing bowl, spoon or spatula, baking sheet or silicone mini muffin mold, parchment paper, and a knife are required for preparation.
- → How should the bites be stored after freezing?
Transfer the frozen bites to an airtight container and keep them in the freezer until ready to enjoy.