 Save
Save Last summer, I was determined to find a dessert that didn't feel like I was sabotaging my gym routine. I'd spent weeks eyeing protein powder in my pantry, wondering if I could bake something that actually tasted good with it. Then one lazy afternoon, instead of heating the oven, I grabbed my mixer and decided to skip the baking altogether. What came together in those twenty minutes—creamy, rich, and surprisingly decadent—completely changed how I thought about post-workout treats.
I made a batch for my friend Sarah the morning after she'd complained about her usual protein bars tasting like cardboard. When she bit into one of these, straight from the fridge, her face actually lit up. She asked for the recipe on the spot, and now she makes them every Sunday. That's when I knew this wasn't just a recipe I liked—it was something worth sharing.
Ingredients
- Oat flour: Use rolled oats blended into flour if you don't have it premade; it gives the base real texture and doesn't taste gritty.
- Almond or peanut butter: The fat here is essential—it holds the base together and adds richness that keeps these from tasting like health food.
- Honey or maple syrup: Either works beautifully; I use honey when I want a milder sweetness and maple when I'm craving something deeper.
- Salt: Just a pinch, but don't skip it—it makes the sweetness pop instead of feeling flat.
- Reduced-fat cream cheese: Softening it first matters; hard cream cheese will create lumps no matter how much you beat it.
- Greek yogurt: This is your secret weapon for creaminess without making the filling heavy; the tanginess balances the sweetness perfectly.
- Vanilla whey protein powder: This is the hero ingredient that keeps everything tasting like dessert, not a supplement.
- Lemon zest: Optional, but it does something magical to brighten the whole thing up if you add it.
Tired of Takeout? 🥡
Get 10 meals you can make faster than delivery arrives. Seriously.
One email. No spam. Unsubscribe anytime.
Instructions
- Make the base:
- Combine oat flour, almond butter, honey, and salt in a bowl until it looks like wet sand. You want it crumbly but cohesive—if it's too dry, add a tiny bit more honey.
- Build the foundation:
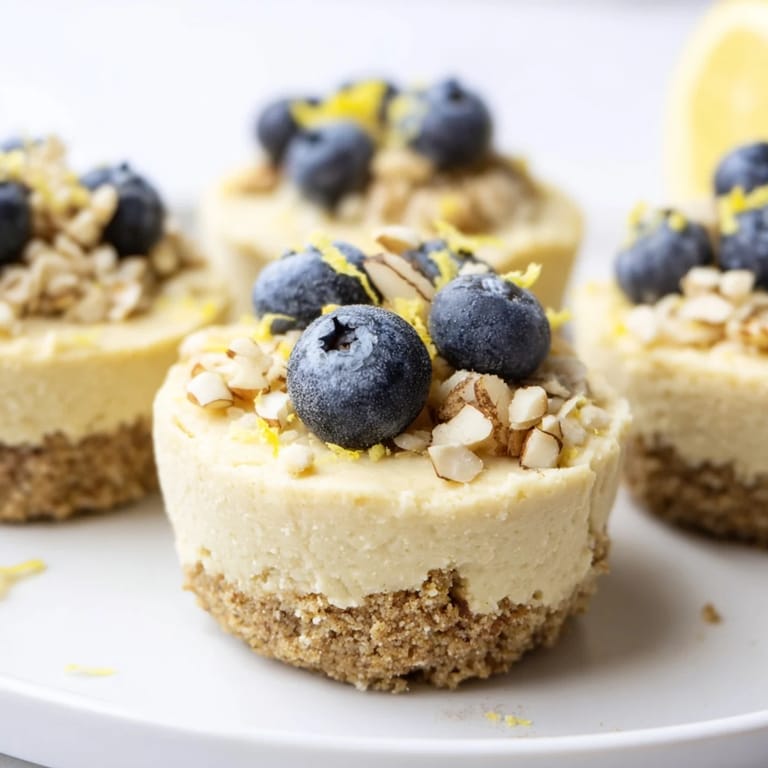
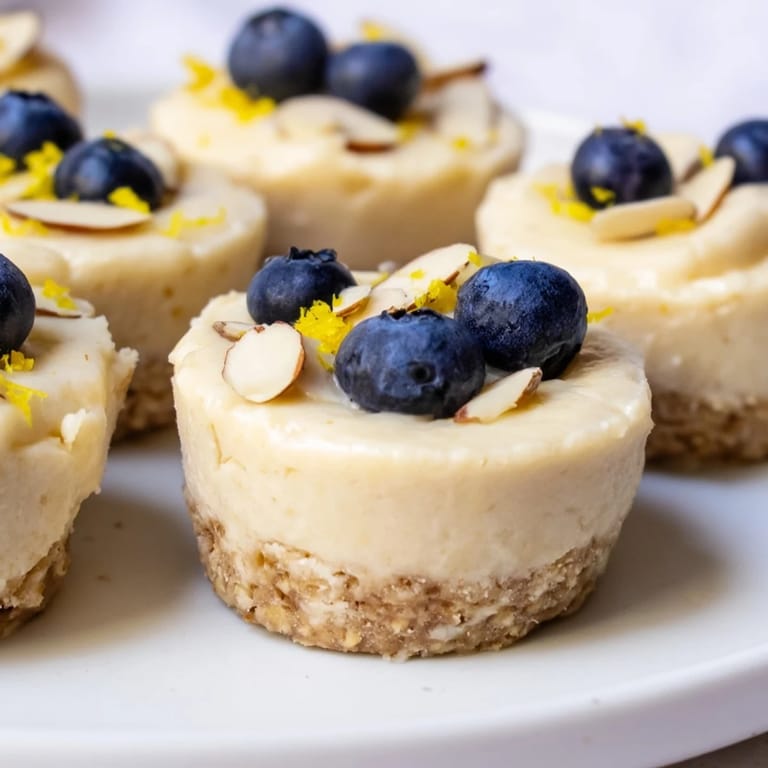
- Press the mixture firmly into muffin liners, creating an even layer. I use the back of a measuring spoon to pack it down so nothing shifts when you add the filling.
- Whip the filling:
- Start with softened cream cheese and beat it until it's completely smooth before adding anything else. Then fold in yogurt, protein powder, honey, vanilla, and zest, stirring until there are no streaks.
- Assemble:
- Spoon the filling over each base and smooth the tops with a spatula. They'll look thick and creamy, which is exactly right.
- Add personality:
- Top with berries, nuts, or chocolate shavings if you want—this is where you can make each one slightly different based on your mood.
- Set and serve:
- Refrigerate for at least two hours until they're firm all the way through. Pop them out of the liners and serve straight from the fridge.
 Save
Save The moment I realized these had become a staple was when my neighbor asked if I could bring them to a potluck. People kept asking for seconds, and one person even asked if they were store-bought because they couldn't believe I'd made them. That's when dessert stopped being about calories and started being about connection.
The Magic of No-Bake
There's something freeing about a recipe that doesn't require an oven. You can make these in the morning for an afternoon snack, or throw them together on a Wednesday night for a weekend treat. The only equipment you need is a bowl and a mixer—no preheating, no timer anxiety, no burnt-edge disasters.
Making Them Your Own
The base formula is flexible enough to adapt to whatever you have on hand. I've made them with peanut butter, coconut oil, and even crushed gluten-free cookies. The filling tolerates substitutions too—chocolate protein powder, lemon zest swapped for lime, Greek yogurt switched for whipped cottage cheese. Experiment and find what feels right.
Storage and Serving
Keep these in the fridge in a sealed container for up to five days, though they usually disappear faster than that. I've also frozen them successfully for up to two months—just let them thaw in the fridge for an hour before eating.
- These are best eaten straight from the fridge when they're at maximum creaminess.
- If you're meal prepping, make a double batch on Sunday and you'll have ready-to-grab protein throughout the week.
- They pair beautifully with strong coffee or a cold glass of milk.
 Save
Save These little cups remind me that healthy eating doesn't have to feel like a sacrifice. They're proof that something can be genuinely delicious and genuinely good for you at the same time.
Recipe FAQs
- → Can I make these cheesecake cups gluten-free?
Yes, use almond flour instead of oat flour or choose certified gluten-free oats to keep the base gluten-free.
- → What protein powder works best for the filling?
Vanilla whey protein powder is recommended for smooth flavor and texture, but plant-based powders can be used for vegan versions.
- → How long should the cups chill before serving?
Refrigerate for at least 2 hours to allow the filling to set firmly and develop creamy consistency.
- → Can I customize the toppings?
Absolutely! Fresh berries, chopped nuts, or dark chocolate shavings add flavor and texture.
- → Is it possible to sweeten without honey or maple syrup?
Yes, you can use alternatives like agave syrup, stevia, or your preferred natural sweetener to suit dietary needs.