 Save
Save The kitchen smelled like burnt sugar the first time I tried making these bars, and I panicked thinking I'd ruined everything. Turns out, that deep caramel scent was exactly what I was after. I'd been craving those chocolate-caramel-pecan candies my grandmother used to keep in a glass dish, but I wanted something I could slice and share at a potluck. After a few trials and one very sticky countertop, these bars became my answer. Now, every time I pull them from the oven, I think of that near-disaster and how close I came to tossing the whole batch.
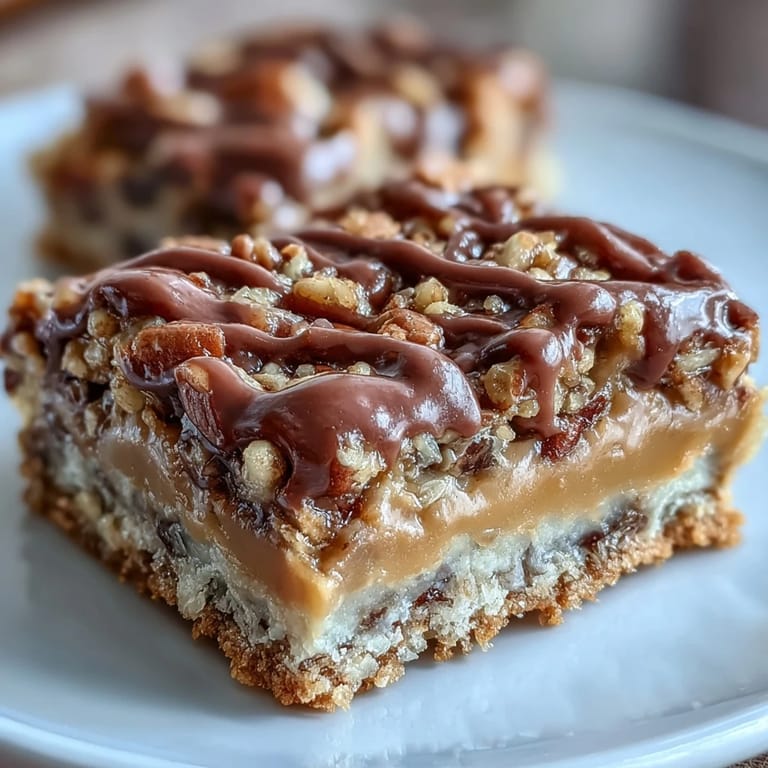
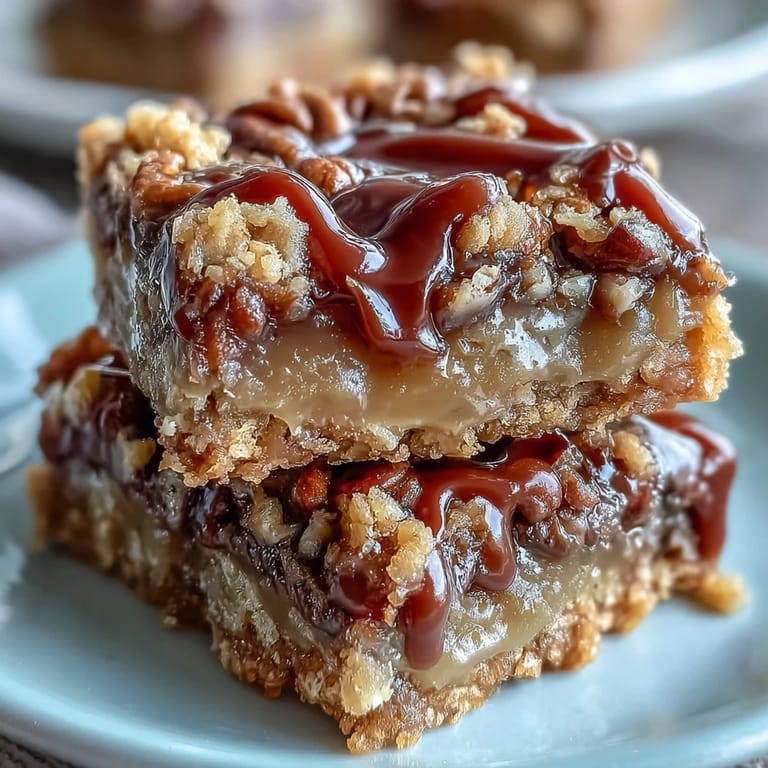
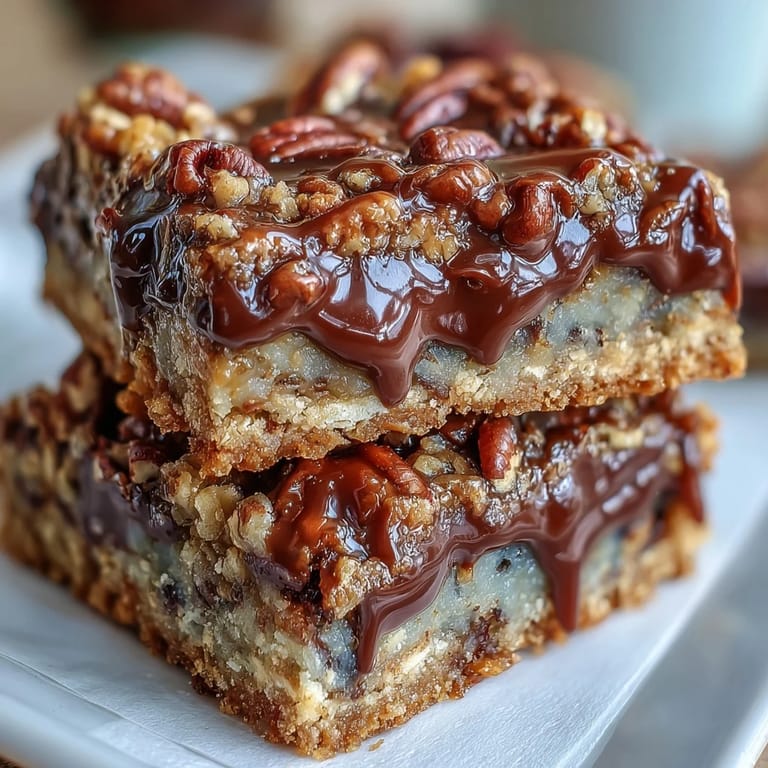
I made these for my neighbor's book club once, and three people asked for the recipe before I even sat down. One woman admitted she hid two bars in her purse to take home, and I took that as the highest compliment. The combination of textures gets people every time: that tender chew from the oats, the snap of chocolate, the give of warm caramel. I've since learned to double the batch because they vanish faster than anything else I bake.
Ingredients
- All-purpose flour: This creates structure in both the crust and crumble without making the bars cakey or dry.
- Rolled oats: Old-fashioned oats work best here because they hold their shape and give you that chewy, rustic bite quick oats turn mushy.
- Packed brown sugar: Press it firmly into the measuring cup so the molasses content stays consistent and the crust caramelizes properly.
- Granulated sugar: Balances the brown sugar and keeps the crumble from becoming too dense or sticky.
- Unsalted butter, melted: Melted butter distributes evenly through the dry ingredients and makes the crumble easy to press and sprinkle.
- Salt: Just a pinch sharpens the sweetness and keeps the caramel from tasting flat.
- Baking soda: A small amount helps the crust and topping turn golden and slightly crisp without puffing up.
- Semi-sweet chocolate chips: These melt into puddles when they hit the warm crust, creating pockets of fudgy richness.
- Chopped pecans: Toasted pecans add a buttery crunch, but if you skip toasting them, they'll soften into the caramel instead.
- Caramel sauce: Store-bought works beautifully, but if you make your own, let it cool slightly before mixing with cream or it'll seize.
- Heavy cream: This thins the caramel just enough to drizzle smoothly without losing that thick, sticky coating.
Tired of Takeout? 🥡
Get 10 meals you can make faster than delivery arrives. Seriously.
One email. No spam. Unsubscribe anytime.
Instructions
- Prep Your Pan:
- Preheat your oven to 350°F and grease a 9x9-inch pan generously, or line it with parchment so the bars lift out cleanly once cooled. I've had caramel weld itself to unlined pans, and it's not a fun cleanup.
- Mix the Crumble:
- In a large bowl, stir together flour, oats, both sugars, melted butter, salt, and baking soda until the mixture looks like damp sand with pebbles. It should clump when you squeeze it but still feel crumbly.
- Form the Crust:
- Set aside 1 cup of the crumble mixture in a separate bowl. Press the rest firmly into the bottom of your pan, making sure the corners are covered evenly. A flat-bottomed glass helps pack it down without sticking to your hands.
- Par-Bake the Base:
- Bake the crust for 10 minutes until it just starts to turn golden at the edges. This step sets the base so it doesn't turn soggy under the caramel.
- Make the Caramel Layer:
- While the crust bakes, warm your caramel sauce and heavy cream in a small saucepan over medium-low heat, stirring constantly until smooth. Don't let it boil or the cream will break.
- Layer Chocolate and Pecans:
- Pull the crust from the oven and immediately scatter chocolate chips evenly over the hot surface, then add the chopped pecans. The residual heat will start melting the chocolate right away.
- Pour the Caramel:
- Drizzle the warm caramel sauce slowly over the chocolate and pecans, moving the spoon in a zigzag pattern to cover every inch. It'll pool and settle as it cools.
- Add the Crumble Topping:
- Sprinkle the reserved crumb mixture evenly over the caramel, pressing lightly so it sticks but doesn't sink all the way through. This layer will bake into a golden, crunchy lid.
- Finish Baking:
- Return the pan to the oven and bake for 15 to 20 minutes, until the topping is deeply golden and the caramel is bubbling at the edges. Watch the last few minutes so the oats don't burn.
- Cool and Slice:
- Let the bars cool completely in the pan on a wire rack, at least 30 minutes, before cutting into squares. Warm bars will fall apart, but chilled ones slice like a dream.
 Save
Save I brought these to a birthday party once and watched a grown man close his eyes after the first bite, then quietly go back for three more. His wife laughed and said he never eats sweets, but something about the salty-sweet balance and the crunch won him over. That's when I realized these bars aren't just dessert, they're a little moment of comfort that sneaks up on people.
Storing and Keeping Them Fresh
These bars stay chewy and delicious in an airtight container at room temperature for up to a week, though they rarely last that long in my house. If your kitchen runs warm, store them in the fridge to keep the caramel from getting too soft. Just let them sit at room temperature for a few minutes before serving so the chocolate isn't rock-hard. I've also frozen them in a single layer, wrapped tightly, and they thaw beautifully for unexpected guests.
Swapping Ingredients Without Losing Magic
If you don't have pecans, walnuts or almonds work just as well, though almonds give a slightly cleaner, less buttery crunch. I've swapped dark chocolate chips for semi-sweet when I wanted a more intense, less sugary finish. For a salted caramel version, sprinkle flaky sea salt over the caramel layer before adding the crumble, it cuts through the sweetness and makes every bite more complex. You can even use maple syrup in place of some of the brown sugar for a deeper, woodsy flavor in the crust.
Troubleshooting Common Issues
If your topping browns too fast, tent the pan loosely with foil for the last five minutes of baking. If the bars turn out crumbly instead of chewy, you may have overbaked them or used too little butter in the base. If the caramel seeps out the sides, your layer was too thin or you didn't press the crust up the edges slightly to create a little wall.
- Use parchment paper with overhang so you can lift the whole block out and slice on a cutting board instead of in the pan.
- Warm your knife under hot water and wipe it clean between cuts for the neatest squares.
- Let the bars sit for a full 30 minutes before slicing, or the caramel will ooze and the layers will slide apart.
 Save
Save These bars have become my go-to whenever I need to show up with something that feels generous and tastes like I spent all day in the kitchen. The truth is, they come together quickly, but no one ever believes me when I say so.
Recipe FAQs
- → Can I use homemade caramel sauce?
Yes, homemade caramel sauce works beautifully in these bars. Simply prepare your favorite caramel recipe and stir in the heavy cream as specified. Ensure the sauce is warm but not boiling hot when pouring over the chocolate and pecans to prevent melting the chips completely.
- → What other nuts can I substitute for pecans?
Walnuts or almonds make excellent substitutes for pecans in this turtle bar variation. Walnuts provide a similar rich, buttery flavor profile, while almonds add a slightly sweeter, more delicate crunch. Toast the nuts lightly before sprinkling over the crust for enhanced flavor.
- → How do I know when the bars are done baking?
The bars are finished when the crumb topping turns golden brown and the caramel layer bubbles slightly around the edges. The topping should feel set when gently touched, though the center may still appear slightly soft due to the caramel. Remember that the bars will continue to set as they cool.
- → Why must I cool the bars completely before cutting?
Cooling allows the caramel layer to set properly, ensuring clean cuts and preventing the squares from falling apart. Cutting while warm causes the caramel to ooze and the layers to separate. Plan for at least 30 minutes of cooling time, though refrigerating for 1 hour yields the neatest squares.
- → Can I make these bars ahead of time?
Absolutely. These turtle bars actually improve in flavor after sitting for a day, as the ingredients meld together. Store them in an airtight container at room temperature for up to a week, or freeze individually wrapped squares for up to three months. Thaw frozen bars at room temperature before serving.
- → What's the best way to line the pan for easy removal?
Parchment paper works best for these sticky, caramel-filled bars. Leave overhang on two opposite sides to create handles that allow you to lift the entire batch out effortlessly. Greasing the pan underneath the parchment helps it stay in place while pressing down the crumb crust.